검색결과 리스트
글
android emulator limitations(안드로이드 에뮬레이터 제한사항) 삽질금지
무턱대고 android에 덤벼들지 말자
아래와 같은 하드웨어적인 지원이 아주 약하다.
Emulator Limitations
이번 릴리즈에는. 에뮬레이터의 제약조건은 다음을 포함함다.
- 실제 전화통화를 주고 받을 수 없다. 그러나 에뮬레이터 콘솔 화면을 통해서 전화통화(보내고 받는것)을 시뮬레이션 할수 있다.
- USB연결에 대한 지원이 안된다.
- 카메라나 비디오 캡쳐 지원이 안된다.(입력)
- 음성 입력에 대한 지원이 안된다. 하지만 음성출력은 지원된다.
- 장치에 부착된 헤드폰을 지원 안한다.
- 연결된 상태를 알수 없다.
- 배터리 충전 level과 AC 충전중인 상태를 알 수 없다.
- SD카드를 끼웠는지 뺐는지를 알수 없다.
- 블루투스를 지원하지 않는다.
출처 : http://code.google.com/android/reference/emulator.html#limitations
설정
트랙백
댓글
글
Designing Your Screen in XML(andorid XML디자인)
Designing Your Screen in XML
소스코드 안에다 화면 디자인하는것이 성가신 작업이 될 수 있기에, Android는 XML문법으로 화면 디자인하는 것을 지원한다. Android는 아주 많은수의 custom elements를 정의하고 있고, 그것들은 독특한 Android View subclass를 대표한다. 당신은 일련의 태그기반의 HTML파일을 생성한것과 같은 방법으로 화면을
디자인할수 있고, 그 파일은 application의 res/layout 디렉토리 안에 XML 파일로 저장된다. 어떤 elements가 표현되는지 그리고 XML파일 포맷을 배우기 위해서 Layout Resources를 보아라. 각 파일은 single android.view.View를 설명하고 있다. 하지만 이 element는 단순한 visual element 또는 자식 객체들의 collection을 포함하는 layout element가 될수도 있다(screen 또는 screen의 일부). Android가 당신의 application을 compiles 할때, 그것은 android.view.View 리소스로 complie하고, 당신의 Activity.onCreate() 안에 구현된 setContentView(R.layout.layout_file_name)을 호출하는 것으로 당신의 코드안에서 그것을 load할 수 있다.
각 XML파일은 android GUI classes에 상응하는 태그들로 구성된다. 이 태그들은 class안에 있는 methods에 상응하는 attributes를 가지고 있다.(예를 들면, EditText는 text attibute를 가지고 그것은 EditText.setText와 같다.)
class와 method 이름들 그리고 element와 attribute 이름들이 정확하게 일치하는 것은 아니라는걸 명심해라. - 거의 비슷하다, 하지만 항상 1대1 관계는 아니다.
또한 Android는 XML안에 그들이 나타나는 순서대로 elements를 그리는 경향이 있다. 그래서 elements가 겹치게 되면, XML파일안에 마지막놈이 같은 공간에 있는 이전에 listing된 elements들중 1순위로 그려지게 될 것이다.
각 XML파일은 single View 또는 ViewGroup 객체에 기반을 둔 tree로 컴파일된다. 그래서 single root 태그를 포함해야 한다. 다음 예제에서, 그것은 가장 바깥에 있는 LinearLayout 객체를 evaluate한다.
layout_somthing이라 이름 붙여진 Attriutes는 객체의 LayoutParams멤버로 적용된다. Layout Resources는 또한 LayoutParams의 peroperties를 상세하기 위한 문법을 어떻게 배우는지 설명한다.
다음 값들은 치수를 지원한다.(TypedValue에 설명되어 있음)
- px (pixels)
- dip (device independent pixels)
- sp (scaled pixels — best for text size)
- pt (points)
- in (inches)
- mm (millimeters)
Example: android:layout_width="25px"
이 dimensions에 대한 더많은 정보를 원한다면, Dimension Values를 보아라.
다음 XML파일은 (오른쪽과같이)보여지는 screen을 생성한다. screen의 상단에 위치한 text는 Activity.setTitle라 불리는 것에 의해 set되는 것을 기억해라. 관련된 elements(layout_toLeft)를 가리키는 attributes는 연관된 resource의 문법을 사용하는 ID를 참조한다.(@id/id_number)
The following XML file creates the screen shown. Note that the text on the top of the screen was set by calling Activity.setTitle. Note that the attributes that refer to relative elements (i.e., layout_toLeft) refer to the ID using the syntax of a relative resource (@id/id_number).
<?xml version="1.0" encoding="utf-8"?>
<!-- Demonstrates using a relative layout to create a form -->
<RelativeLayout xmlns:android="http://schemas.android.com/apk/res/android
                android:layout_width="fill_parent"
                android:layout_height="wrap_content"
                android:background="@drawable/blue"
                android:padding="10px">

    <TextView id="@+id/label"
              android:layout_width="fill_parent"
              android:layout_height="wrap_content"
              android:text="Type here:"/>

    <EditText id="@+id/entry"
              android:layout_width="fill_parent"
              android:layout_height="wrap_content"
              android:background="@android:drawable/editbox_background"
              android:layout_below="@id/label"/>

    <Button id="@+id/ok"
            android:layout_width="wrap_content"
            android:layout_height="wrap_content"
            android:layout_below="@id/entry"
            android:layout_alignParentRight="true"
            android:layout_marginLeft="10px"
            android:text="OK" />

    <Button android:layout_width="wrap_content"
            android:layout_height="wrap_content"
            android:layout_toLeft="@id/ok"
            android:layout_alignTop="@id/ok"
            android:text="Cancel" />
</RelativeLayout> |
 |
Loading the XML Resource
컴파일된 layout resource를 loading하는 것은 매우 쉽고 application의 onCreate()를 호출하는것에 의해 실행된다. 아래와같다
protected void onCreate(Bundle savedValues)
{
   // Be sure to call the super class.
   super.onCreate(savedValues);

   // Load the compiled layout resource into the window's
   // default ViewGroup.
   // The source file is res/layout/hello_activity.xml
    setContentView(R.layout.hello_activity);

   // Retrieve any important stored values.
   restoreValues(savedValues);
} 설정
트랙백
댓글
글
android 계산기 한번 만들어 보자꾸나
난 개발자다.
근데.,,월요일 화요일 회사 세바뀌를 돌았다.
고정자산이다, OA자산 실사 준비다
이것저것 때문에... 소스분석하고 개선할 시간이 진짜 없었다.
개발자는 개발만 할 수 있으면 좋겠다. 흐흐흐...
오늘 화요일 현장을 돌아다니면서.. 요놈의 android가 계속 생각난다.
진짜 내가 맘에 들어하는 놈인거 가따.
일단 안드로이드 분석은 이쯤 하면 됐다 싶고....
계산기란 놈을 함 만들어보고 싶었다.
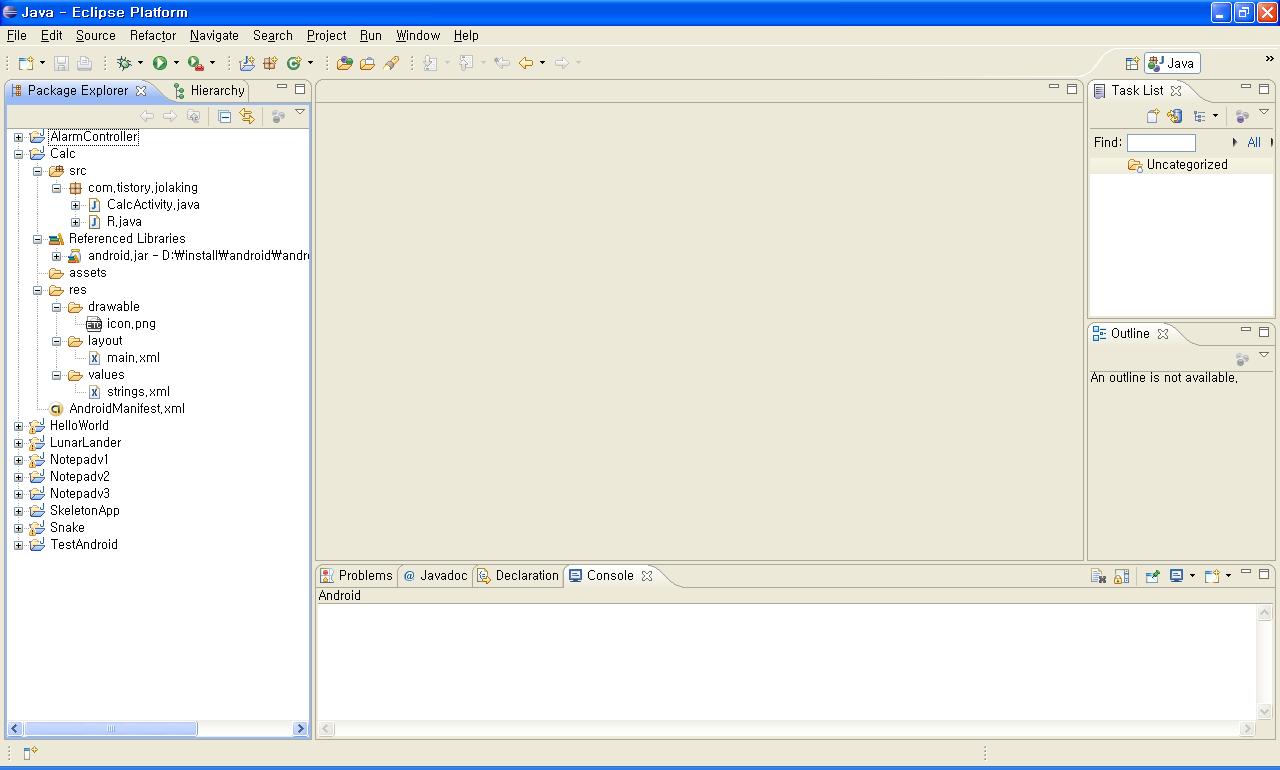
일단 기본android 프로젝트를 생성했다 .Calc라는 놈으로
프로젝트 생성을 마치고...젤 먼저 생각해야 될 것이..
UI이다.
일단 계산하는 값 2개를 받고
연산자 선택하고
결과 같 표시를 해야 될 듯 싶어
다음과 같이 만들었다.
res/layout/main.xml
-------------------------------------------------------------------------------------------------
<?xml version="1.0" encoding="utf-8"?>
<LinearLayout xmlns:android="http://schemas.android.com/apk/res/android"
android:orientation="vertical"
android:layout_width="fill_parent"
android:layout_height="fill_parent"
>
<TextView id="@+id/result"
android:layout_width="wrap_content"
android:layout_height="wrap_content"
android:text="@string/result" />
<LinearLayout android:orientation="horizontal"
android:layout_width="fill_parent"
android:layout_height="wrap_content"
>
<EditText id="@+id/leftBox" android:layout_width="fill_parent"
android:layout_height="wrap_content"
android:layout_weight="1" />
<TextView id="@+id/operator"
android:layout_height="fill_parent"
android:layout_width="wrap_content"
android:text="@string/operator"/>
<EditText id="@+id/rightBox" android:layout_width="fill_parent"
android:layout_height="wrap_content"
android:layout_weight="1" />
</LinearLayout>
<LinearLayout android:orientation="horizontal"
android:layout_width="fill_parent"
android:layout_height="wrap_content"
>
<Button id="@+id/operatorPlus"
android:text="@string/operatorPlus"
android:layout_width="wrap_content"
android:layout_height="wrap_content" />
<Button id="@+id/operatorMinus"
android:text="@string/operatorMinus"
android:layout_width="wrap_content"
android:layout_height="wrap_content" />
<Button id="@+id/operatorMulti"
android:text="@string/operatorMulti"
android:layout_width="wrap_content"
android:layout_height="wrap_content" />
<Button id="@+id/operatorDivide"
android:text="@string/operatorDivide"
android:layout_width="wrap_content"
android:layout_height="wrap_content" />
</LinearLayout>
<Button id="@+id/calculate"
android:text="@string/calculate"
android:layout_width="wrap_content"
android:layout_height="wrap_content" />
</LinearLayout>
----------------------------------------------------------------------------------------------
두번째로는 text값을 저장하고 있는 string.xml생성
/res/values/string.xml
----------------------------------------------------------------------------------------------
<?xml version="1.0" encoding="utf-8"?>
<resources>
<string name="app_name">calculator</string>
<string name="result">Calculation Result</string>
<string name="calculate">calculate</string>
<string name="operator">oper</string>
<string name="operatorPlus">+</string>
<string name="operatorMinus">-</string>
<string name="operatorMulti">*</string>
<string name="operatorDivide">/</string>
</resources>
---------------------------------------------------------------------------------------------
세번째로 각 버튼마다 이벤트를 넣었다.
src/com.tistory.jolaking/CalcActivity.java
----------------------------------------------------------------------------------------------
package com.tistory.jolaking;
import android.app.Activity;
import android.os.Bundle;
import android.view.View;
import android.widget.Button;
import android.widget.EditText;
import android.widget.TextView;
public class CalcActivity extends Activity {
private TextView tv;
private Button operatorPlus;
private Button operatorMinus;
private Button operatorMulti;
private Button operatorDivide;
private TextView operView;
String oper;
String [] operations = {"+", "-", "*", "/"};
/** Called when the activity is first created. */
@Override
public void onCreate(Bundle icicle) {
super.onCreate(icicle);
setContentView(R.layout.main);
Button calculate = (Button) findViewById(R.id.calculate);
tv = (TextView) findViewById(R.id.result);
operatorPlus = (Button) findViewById(R.id.operatorPlus);
operatorMinus= (Button) findViewById(R.id.operatorMinus);
operatorMulti= (Button) findViewById(R.id.operatorMulti);
operatorDivide= (Button) findViewById(R.id.operatorDivide);
operView = (TextView) findViewById(R.id.operator);
operatorPlus.setOnClickListener(new View.OnClickListener(){
@Override
public void onClick(View arg0) {
// TODO Auto-generated method stub
oper = "+";
operView.setText("+");
}
});
operatorMinus.setOnClickListener(new View.OnClickListener(){
@Override
public void onClick(View arg0) {
// TODO Auto-generated method stub
oper = "-";
operView.setText("-");
}
});
operatorMulti.setOnClickListener(new View.OnClickListener(){
@Override
public void onClick(View arg0) {
// TODO Auto-generated method stub
oper = "*";
operView.setText("*");
}
});
operatorDivide.setOnClickListener(new View.OnClickListener(){
@Override
public void onClick(View arg0) {
// TODO Auto-generated method stub
oper = "/";
operView.setText("/");
}
});
calculate.setOnClickListener(new View.OnClickListener(){
@Override
public void onClick(View arg0) {
// TODO Auto-generated method stub
try{
EditText leftBox = (EditText) findViewById(R.id.leftBox);
EditText rightBox = (EditText) findViewById(R.id.rightBox);
String leftValue = leftBox.getText().toString();
String rightValue = rightBox.getText().toString();
String operator = oper;
double result = calculate(leftValue, rightValue, operator);
tv.setText(String.valueOf(result));
}catch(Exception e){
tv.setText("Incorrect String");
}
}
});
}
public double calculate(String leftValue, String rightValue, String operator) throws Exception{
double result = 0;
int operIndex = 99;
// operation 검사
for(int i = 0 ; i < operations.length ; i++){
if(operations[i].equals(operator)){
operIndex = i;
break;
}
}
if(operIndex == 99)
throw new Exception();
double leftV = Double.parseDouble(leftValue);
double rightV = Double.parseDouble(rightValue);
if(operator.equals("+")){
result = leftV + rightV;
}else if(operator.equals("-")){
result = leftV - rightV;
}else if(operator.equals("*")){
result = leftV * rightV;
}else if(operator.equals("/")){
result = leftV / rightV;
}
return result;
}
}
---------------------------------------------------------------------------------------------------
이게 끝...
생각보다 간단히 만들었다...간만에 오류 없이 컴파일까지 되더라..
역시 JAVA는 깊게 들어갈 수록 어렵지만...초반엔 적응하기 싶더라...
일단 여기까지 하면 R.java는 자동으로 생성이 될 것이고 ...실행을 해봤더니..ㅡ.ㅡ
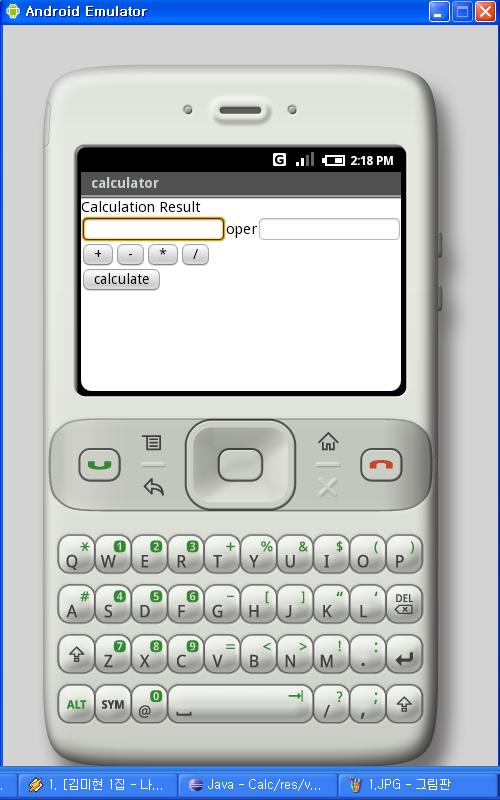
계산기 실행화면.. 단순하다 ㅡ.ㅡ
에게 줄맞춤도 그렇고.. 디자인은 진짜 허접하다 흐흐흐
이래도 사칙연산을 실행해보면 아래와 같이 잘 되는군..후훗
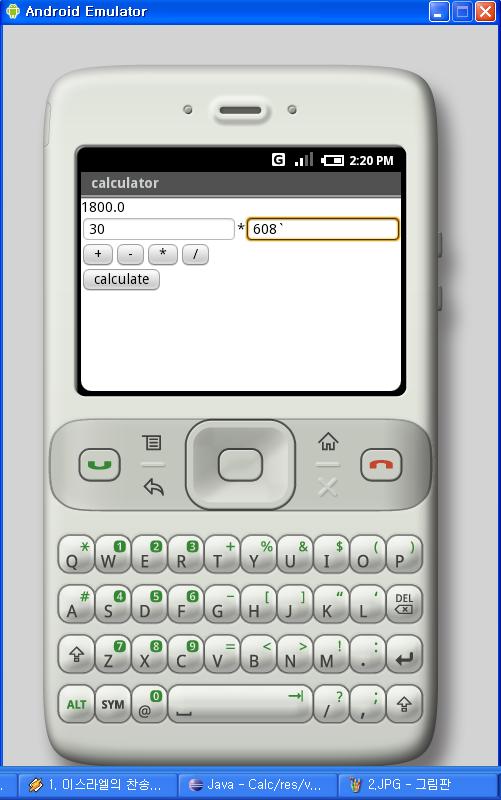
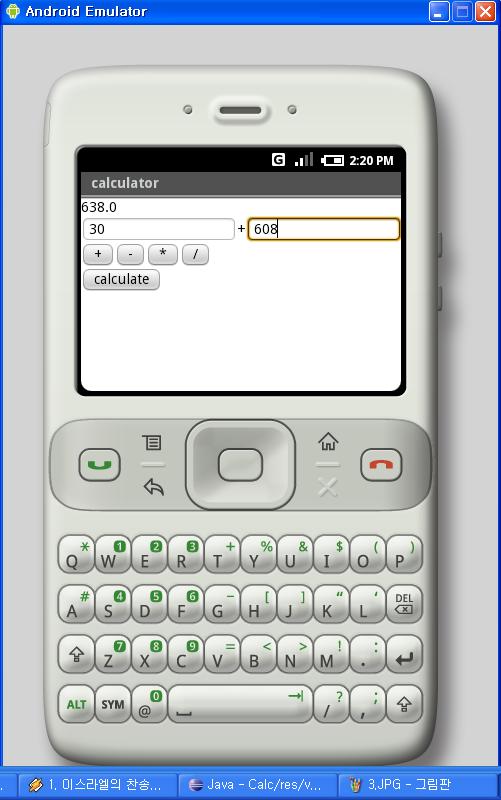
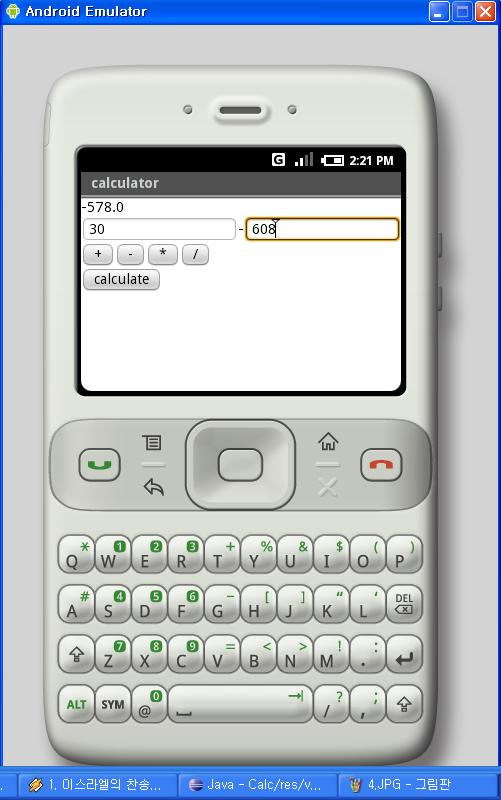
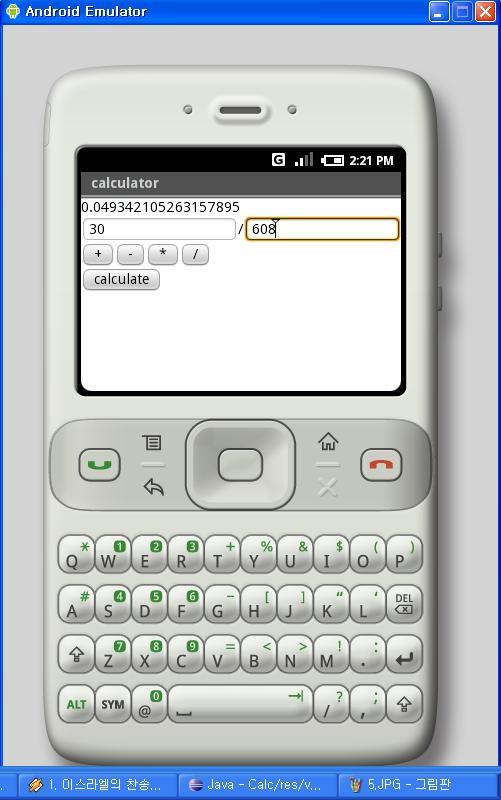
에혀.. 다시봐도 맘에 안드는게.. 역시 UI는 이뻐야 된다는 거..
layout 관련 API좀 더 자세히 봐야겠다..
담에는 내 핸폰에 있는 PGM UI 똑같이 만드는거 연습좀 하자..
그럼 끝.
